Crawl space mold remediation is important for homeowners who want to protect their property and family from health risks associated with mold exposure. Whether you hire professional help or take on the task yourself, understanding how crawl space mold develops and what steps are needed for effective removal is essential. In this blog post, we will discuss common causes of crawl space mold growth, tips on prevention and DIY removal methods, and aftercare advice to help maintain a clean and healthy living environment within your home.
What is Crawl Space Mold?
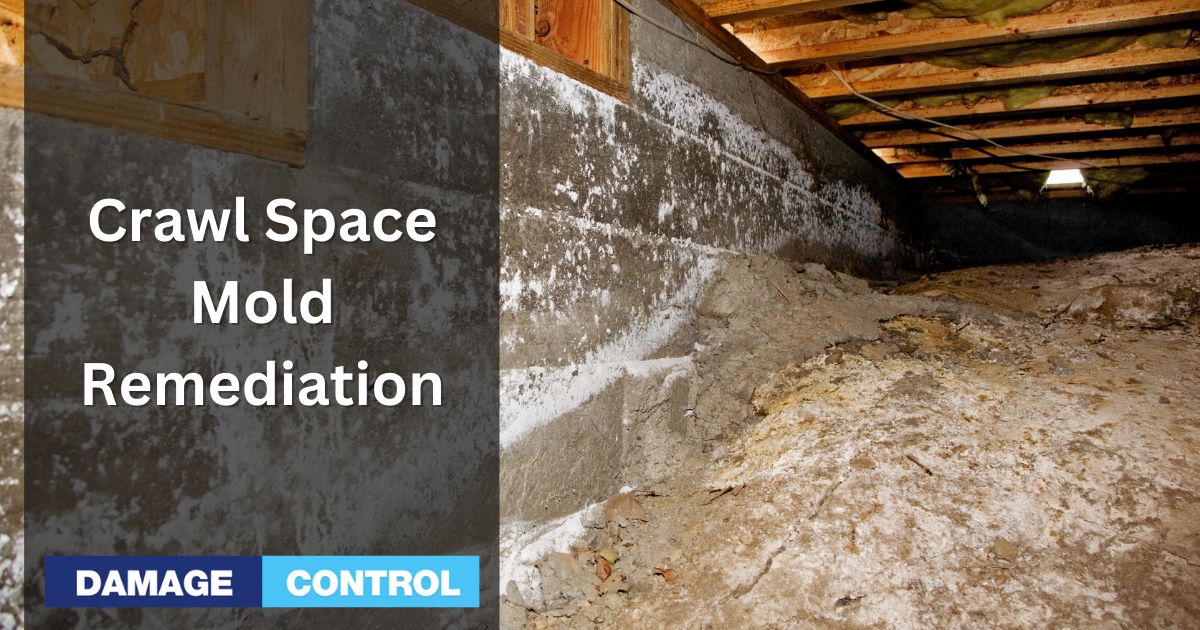
Mold in your crawlspace is a sign that your home has a moisture problem beneath it. Crawl spaces often have bad ventilation, so the air stagnates, and any humidity that has formed in that space remains there. This fosters mold growth, and that can become extensive quickly.
How to Prevent Crawl Space Mold
Inspect Your Foundation Walls
One of the first things you should do to prevent crawl space mold is to check your home's foundation walls for cracks and leaks. Check for seepage of water from outside coming inside. This can be common when the land around the house slopes toward the foundation and causes water to pool up next to it. Gutters can also cause water to pool around the foundation and leak into your crawlspace.
Check Humidity Levels and For Plumbing Leaks
Humidity levels should be kept between 30-50% to prevent mold growth, so if you place a hygrometer into that space and it's over 50%, that's a sign that you have a problem. You can use a dehumidifier made specifically for crawl spaces to maintain the low humidity levels you're after. Additionally, inspecting any plumbing that runs beneath the house for leaks is important because any pipe can develop a slow leak, and you won't ever know it unless you do regular inspections. You should inspect your crawl space at least 2 to 3 times yearly.
Insulate Your Crawl Space Pipes
If you have plumbing running through your crawl space, it should all be insulated. Changing temperatures throughout the year can cause condensation on the pipes, contributing to the humidity level. Protecting your plumbing will not only help prevent condensation buildup but also help prevent frozen plumbing in the winter.
Fix Ventilation Issues
Ensure the crawl space vents are open throughout the year so fresh air can circulate properly and reduce moisture buildup from condensation on walls or floors. If possible, consider installing a fan system that will help move air through your crawlspace more efficiently and provide additional protection against mold formation. Crawl space fans generally run anywhere between $120 and $200+ and should be strategically used in place of some of your vents.
Use a Crawl Space Dehumidifier
As mentioned before, using a dehumidifier made specifically for crawl spaces is another great way to keep humidity levels low. They can be costly, but a dehumidifier may be your last resort if you've tried other methods to keep the humidity level in your crawl space below 40 to 50% without much luck.
DIY Crawl Space Mold Remediation Tips
Taking on an entire crawl space mold remediation project alone isn't something we can recommend because you're stepping into a project that could get extensive and dangerous quickly. This isn't a decision you should make lightly; if your mold infestation is vast and you're not appropriately equipped, you can become very sick in only a short time. Let me explain how that works.
A mold test is an air quality test. They're measuring the parts per million of mold spores of specific types when your area is tested for mold. Crawling up into a crawl space that's completely infested will put such a high concentration of mold spores in the air that you increase the odds of becoming medically impaired.
People with pre-existing medical conditions or weakened immune systems are especially vulnerable to mold. However, even the healthiest individuals can be severely affected in areas with a high concentration of mold spores. While you might have been safe without protective gear, it only takes one exposure to harm you.
The odds of this DIY project being a failure and you having to call in a professional in the end, is high. This is mainly because you're probably not seeing it all. If it's in your crawl space, the water source likely came from above.
There's a good chance that you have mold in your house in the area that you have a mold problem in the crawl space. And if it started in your crawl space, it's probably moved into your house. Remember the parts per million? That can get into the interior walls of your home into your insulation, drywall, flooring, etc.
But if you insist on doing this yourself, here's the minimum of what you must do.
First, you shouldn't take on this project if you haven't yet dealt with the water source. Whether it's caused by leaky plumbing, water intrusion into the crawl space from water pooling around the foundation, etc, until you fix that problem, there's no sense in trying to fix the mold problem. There's also no sense in trying to do this if you know there is a high chance of it being rainy and humid over the next week.
Safety should always be the number one priority for DIY mold remediation projects. Before beginning any project, wear protective gear such as a respirator mask, hazmat protective suit, protective booties, and gloves.
A dust mask or even an N95 mask will not work; you need an actual respirator mask with the appropriate filters for mold spores. The reason for hazmat suits is that exposure to the wrong types of mold can cause skin rashes, and because the suits are disposable, you won't be carrying the dirt, spores, and debris back into your house.
The supplies needed for a DIY crawl space mold removal project will depend on the size of your home and the severity of the issue. Generally speaking, you’ll need some cleaning solution (such as bleach, vinegar, or commercial mold killer), scrub brushes, and rags/sponges for wiping down surfaces. Be aware that if mold is growing on your joists, it's eating them and you'll need an encapsulator.
Now that you have all your supplies ready to go, it’s time to start tackling this project step by step:
1) Start by removing any standing water, if it exists, from the crawl space with a wet-dry vacuum cleaner.
2) The entire crawl space should be dried out at this point, and no other work should be done until it is dry. This should take 24 to 72 hours on average.
3) After the area is dried out, spray affected areas with an anti-fungal agent and scrub existing mold off of surfaces
4) After everything has been treated and cleaned to the best of your ability, let it dry again. This should be done with blowers and fans; the more you can use here, the better.
5) If your crawl space doesn't have a vapor barrier to separate the underside of your house from the dirt, install one. If it exists, but is worn or has holes in it, it should be replaced.
5) Use a unit specifically designed to keep the humidity level low in crawl spaces.
Following these steps should help you eliminate most surface-level issues, but it's best to leave it up to professionals if more severe damage is present. The EPA suggests professionals if you have more than 10 square feet of mold anywhere in your home.
Conclusion
In conclusion, crawl space mold remediation is an important step in maintaining a healthy home environment because mold from your crawl space can make its way into your living space. While it may be tempting to try and tackle the problem yourself, this is something that you should hire a professional to do because they have the knowledge and experience necessary to do the job right.
Are you in the greater Orlando, Florida area and dealing with crawl space mold remediation? Don't let the issue linger any longer! Damage Control 911 is here to help. Our team of certified mold remediation experts has the experience and knowledge to provide top-notch services that will take care of your problem quickly and safely. Our 24/7 emergency response services allow us to be onsite within hours for a free inspection, so you don’t have to worry about costly delays or further damages. Contact us now at Damage Control 911 –we are ready to help restore your peace of mind!